Saturday, January 26, 2013

Font Fun: What Font Tool

I've been a little absent here {okay, maybe a lot! But we've been super busy at Clover & Violet}, but thought I'd drop in and share one of my favorite new tools.  It's called "What Font" and it allows you to see what font is being used on a website (as long as the font isn't on an image, of course).


All you have to do is drag the "What Font" button to your bookmark bar {similar to the "Pin It" button on Pinterest}, then when you run across a font you're curious about, just click the "What Font" and then hover over the text. Here's an example from the Clover & Violet blog:


And one more from Rhonda, Quilter in the Gap {since I recently set her blog up on Genesis, I thought I'd show it too!}:


I really love this little tool to help find some great fonts that can be used in titles, and not just on images.  Remember how I posted about Google Web Fonts? Well, here's a chance to discover some great fonts and use them in your titles!

Friday, November 2, 2012

Blog Header {Better off Thread}


I've been spending most of my time sewing lately, but I have done a tiny bit of graphic designing still...so, here's the new header for Janice at Better off Thread!  After a few failed attempts, we arrived at this, I thought it was fun that the word thread might look like it was a bit of fabric stitched to the page, without being too busy either.

The biggest chanllenge was finding the right color scheme.  Janice likes bright colors, and while bright is beautiful in images, it can be hard to nail it down to one or two actual colors, without it looking just plain weird, here's one of my attempts that was great in theory, but ugly in real life:


While I was going for a bright rainbow, it turned out to look more like a muddy mess...so I tried this color scheme instead {and switched up the fonts too - Rockwell Extra Bold & Clementine Sketch}:


I have a couple other little projects in the works, which I love doing because it really helps improve my graphics skills while providing a little bit of prettiness for others, but it seems that the sewing commitments are never slowing down, so posts here will probably be few and far between.

In the meantime, you're welcome to visit me over at Clover & Violet and see the other stuff I've been pouring my time into!

Monday, August 20, 2012

Blog Design {Karen's Sewing Room}


Here is my most recent design.  It is fairly simple, and based on the colors of Vintage Modern by Bonnie & Camille for Moda.  Here are the colors I picked:


This design was actually part of my giveaway from Plum and June, but the winner of that giveaway had a blog design and just had me do a few customizations.  So, instead of letting this design sit idle, I put it to use.

The background chevrons and the background of the sewing machine were purchased from Katie's Wish, and the sewing machine silhouette is one I made from a picture of a vintage sewing machine.  I really like how this one turned out!

Tuesday, July 17, 2012

Blog Design {Little Bunny Quilts}


Remember my blog design giveaway...well, I am slow to deliver, but I finally finished Alison's blog, Little Bunny Quilts!  She wanted citrus and wine colors, I had a difficult time choosing, but with a little help, we decided on these!

I also experimented with the sidebar title images {tutorial coming soon} and the dashed line around the menu buttons {it took a ridiculous amount of effort to get those little lines, but I love them!}.

Design Stats:


Template: Blogger Simple White with some edits
Fonts: Stitch and Janda Romantic
Graphics: Bunny

Friday, July 13, 2012

using google web fonts in a blog post


I just discovered Google Web Fonts...who knew one could integrate fun, free fonts in a blog post?  Curious what I mean?  The pink words above are a picture, but the words below are actually typed into this post {both are the font Satisfy}:

Testing, testing, testing...

Pretty neat huh? I started with this tutorial.  Then, after adding the font to your blog, if you want to use it in a post add the following code right above the ]]></b:skin>

}h1 { font-family: 'Satisfy', cursive; font-weight: 400; }

But substitute the name for the font you're using!  Then, when typing a post, add this bit of code around the words that should be the web font:

<div style="font-family: 'Satisfy',cursive;">Text Here</div>

Then adjust the size of the font just as for any other text!

And voilĂ , custom text within a post!

Fun, huh?

Thursday, May 31, 2012

5 Fonts to Remember


I really love fonts...so do most other bloggers, designers, and just people in general...and I really love it when people compile their favorites...so I thought you might enjoy some of my favorites too.  I started this image as a place to write out a few fonts I'd stumbled upon and downloaded, that way I can remember what they were called.  I don't know how often these will post, but enjoy {all fonts are free, just search their names!}.

Tuesday, May 29, 2012

how to add a watermark to photos {tutorial}


Okay, for starters...it seems that whenever I mention watermarking, Pinterest, or Flickr, people assume that I am super worried my photos are going to be stolen, and they kindly remind me {please note, I am not being sarcastic, I think they have the best intentions!} that, in spite of my best efforts, my pictures can still be stolen...

I actually go back and forth on whether I need to {or even do} mark my photos.  But, now with Pinterest and things getting pinned without linking back to their original sources correctly, I like to have my blog stamped on my pictures, then, if someone sees them, they can find me!

Whew...glad to get that out there, now, on to the good parts, how to make a watermark!

The method I use to watermark C&V photos is Picasa.  Since Picasa is a super easy to use photo editing software, and it is downloaded on my computer, it is my tool of choice.  And adding a watermark is easy!

Fullscreen capture 5282012 31335 PM
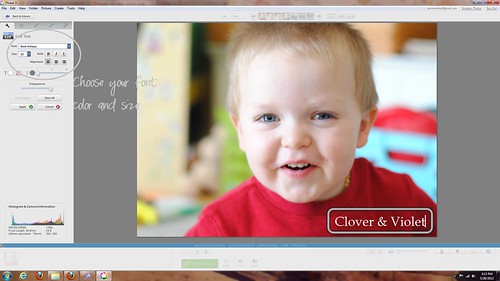
Choose your font color and size


Fullscreen capture 5282012 31346 PM
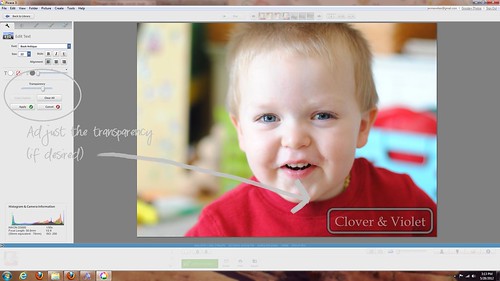
Adjust transparency (if desired)


Fullscreen capture 5282012 31352 PM
Afterwards you can easily remove the watermark by choosing "undo save"

To make your watermark unique, pick out a great font and you're set!

If you want a more complex watermark, with some sort of shape or image, multiple colors or fonts, etc., you will need a picture editing program that can work with layers .  Here are two favorites:

Use on the Web
Download

Personally, I use GIMP, I've known about it longer than I've known of Pixlr, so I'm familiar with the interface.  However, they're both very similar.  If you don't want to download a new program, then Pixlr is a great option.  For this post I'm just going to show you how to use GIMP to put a watermark on your photos.

Watermark with GIMP
First, open the image you want to watermark

Watermark with GIMP
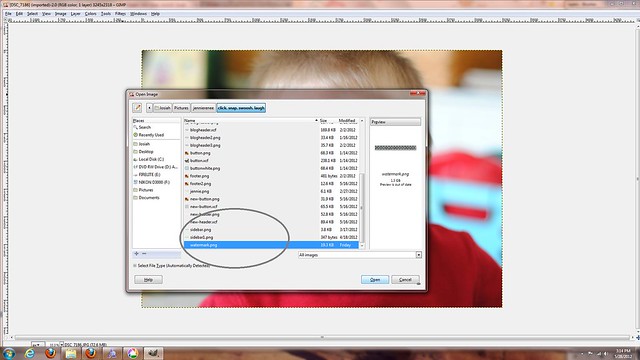
Then open the watermark as layers

Watermark with GIMP
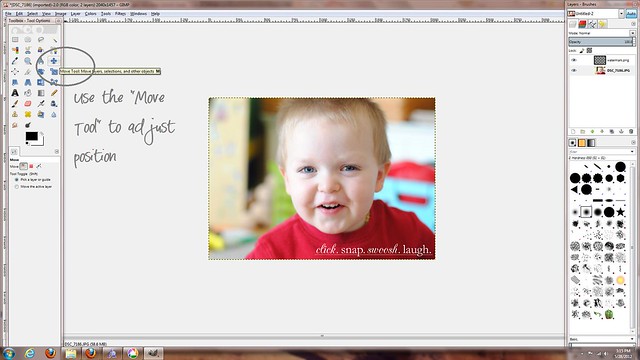
Use the "Move Tool" to adjust position

Watermark with GIMP
Use "Scale Layer" to adjust only the layer size

Watermark with GIMP
Adjust transparency if desired


Then, save your picture!  Note: You will need an image with a transparent background for the watermark, but I shared a tutorial for that yesterday, just click here!  Questions? Want a simple watermark? Just let me know you're a follower and I'll do a drawing for a few free watermark images!