Okay, for starters...it seems that whenever I mention watermarking, Pinterest, or Flickr, people assume that I am super worried my photos are going to be stolen, and they kindly remind me {please note, I am not being sarcastic, I think they have the best intentions!} that, in spite of my best efforts, my pictures can still be stolen...
I actually go back and forth on whether I need to {or even do} mark my photos. But, now with Pinterest and things getting pinned without linking back to their original sources correctly, I like to have my blog stamped on my pictures, then, if someone sees them, they can find me!
Whew...glad to get that out there, now, on to the good parts, how to make a watermark!
The method I use to watermark C&V photos is Picasa. Since Picasa is a super easy to use photo editing software, and it is downloaded on my computer, it is my tool of choice. And adding a watermark is easy!
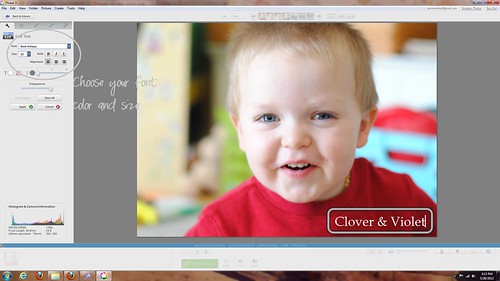 |
| Choose your font color and size |
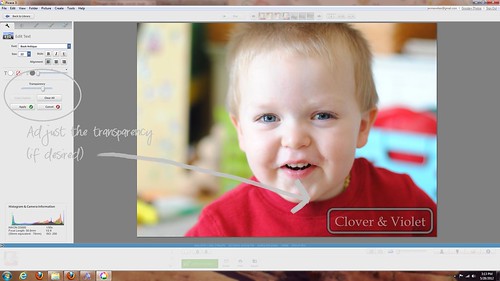 |
| Adjust transparency (if desired) |
 |
| Afterwards you can easily remove the watermark by choosing "undo save" |
To make your watermark unique, pick out a great font and you're set!
If you want a more complex watermark, with some sort of shape or image, multiple colors or fonts, etc., you will need a picture editing program that can work with layers . Here are two favorites:
 |
| Use on the Web |
 |
| Download |
Personally, I use GIMP, I've known about it longer than I've known of Pixlr, so I'm familiar with the interface. However, they're both very similar. If you don't want to download a new program, then Pixlr is a great option. For this post I'm just going to show you how to use GIMP to put a watermark on your photos.
 |
| First, open the image you want to watermark |
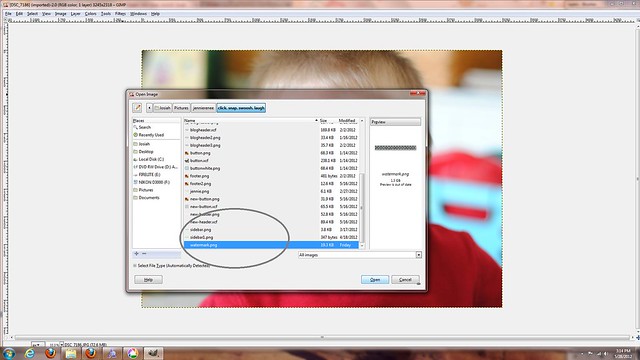 |
| Then open the watermark as layers |
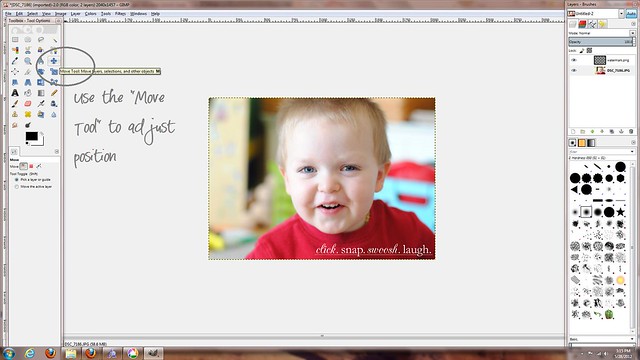 |
| Use the "Move Tool" to adjust position |
 |
| Use "Scale Layer" to adjust only the layer size |
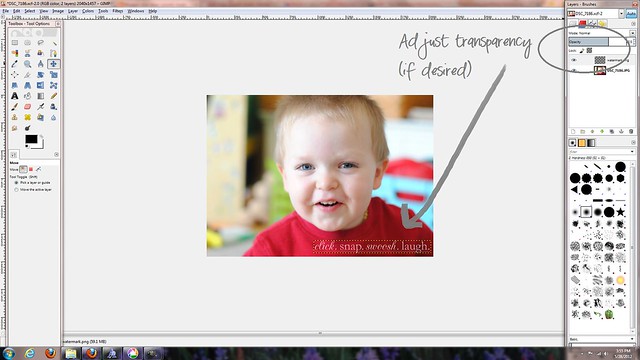 |
| Adjust transparency if desired |
Then, save your picture! Note: You will need an image with a transparent background for the watermark, but I shared a tutorial for that yesterday, just click here! Questions? Want a simple watermark? Just let me know you're a follower and I'll do a drawing for a few free watermark images!


Jennie, don't you feel that it takes a lot of time to do this?? Do you have to go to a different Picasa then the one that is already loaded on your blog account?? I don't see the same page that you are showing here.
ReplyDeleteThe Picasa I use is downloaded on my computer, and it is what I use to import all my photos onto the computer, so it is really simple to add the watermark and I do it before I upload any photos.
DeleteAs far as the GIMP watermark, I only add a few pictures per post, so I feel like the added time is not a huge problem. Also, the more you do it, the quicker it goes. Again, I add the watermark before I upload the pictures to my blog!
Hope that helps!
Jennie,
ReplyDeletethis is a really great tutorial. Thank you :) :) I usually use Picmonkey.com when I want to add "watermark" to my photos...but I'm going to give this a try, too. It's been awhile since I've used Picasa. Love and hugs from the ocean shores of California, Heather ;)
Thanks for this tutorial! I downloaded Paint.net to use as a tool for adding text to my photos, but don't have a separate file for it. I type it out every time. I will have to play around with this when I get some time this week.
ReplyDeleteThanks for the tutorial, Jennie! I can't wait to give it a try!
ReplyDeleteThis is great! I just wrote Beth @ Plum & June that I was having trouble with this and I don't like the font that Picasa adds and it doesn't always want to add it! I just subscribed to your posts and would love some free help. I have a logo I'd like to use.
ReplyDeleteThanks for the help - now to find time to try it.